Healing Hamstrings Attachment Injuries in Yoga

a.k.a. Yogic Butt Pain

The most prevalent injury in the field of yoga is proximal hamstring tendinopathy (PHT). You may know it better as a deep pain in the butt, right where your leg and pelvis meet. It is also commonly referred to as hamstrings attachment injury.

hamstrings pain

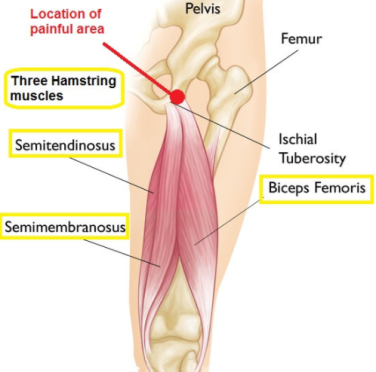
Studies estimate that nearly 80% of yoga practitioners will experience this injury at some point during their practice. It is most common in flexible, female yoga practitioners. Proximal means that the injury is close to the hip joint. Hamstrings refers to the three muscles that make up this group: semimembranosis, semitendinosis, and the biceps femoris. These three all connect with the ischial tuberosities or the “sitting bones” of the pelvis at their origin (for my anatomy nerds, one of the two biceps heads originates on the femur, not the pelvis). The location of the muscle attachment is the reason for the buttock pain during sitting or deep hip flexion.

I use the word tendinopathy here to cover three types of tendon disease: tendinitis (acute injury with inflammation), tendinosis (chronic injury with cellular degeneration but no inflammation), and paratenonitis (inflammation of the outer layer of the tendon). In the field of yoga, we are not here to diagnose or treat injury, and the way we’d approach any of these conditions or a combination of them is the same, so PHT is a good coverall for our purposes.

Depending on the severity of the damage, an injury to our tendons can take from two to 26 weeks to heal. The average yoga practitioner in America heals a PHT in about 18 months. If we want to shorten the healing time, feel better, and get back to our yoga practice we have to unpack some of the reasons that healing isn’t occurring.

Why are so many yogis getting hurt?

It’s helpful to know that this injury happens most commonly in our most flexible and moderately experienced yoga practitioners. It frequently occurs three, five, ten, even 15 years into practice and is generally seen in a practice focusing more on increasing flexibility and range of motion than on strengthening the muscles and tendons at the back of the leg and hip. This is endemic in American Yoga culture.

The challenge for flexible students is that a few months into their yoga practice, the sensations in forward folds decrease significantly as they rapidly approach maximum range of motion for their genetics. The “pursuit of sensation” leads to a tricky situation where students struggle to differentiate between uncomfortable sensations of stretching and uncomfortable sensations of damaging the muscle or its attachment.

In the field of hot yoga, particularly Bikram Yoga’s 26 posture series, the raging debate about “lock the knee” or “micro-bend” have both led to exacerbating the prevalence of PHT because neither side of the debate addressea the supportive role of the deep six hip rotator muscles in preventing hyper-extension and supporting the hamstrings attachments.hyperextended standing bow

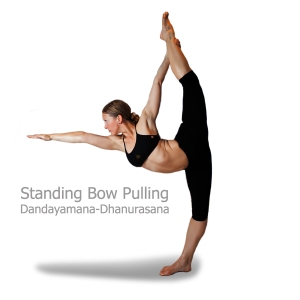
As teachers, we need to deepen our understanding of body weight distribution, hyper-mobility, and the roles our muscles play in taking the pressure off of our soft tissues. Too often, I see Instagram posts of yogis in Standing Bow or Dancer’s Pose with a relaxed posterior hip, internally rotated femur, and a hyper-extended knee. The answer to this problem isn’t a “micro-bend” in the knee. It is a stronger set of hip muscles and a well-aligned femur. More on how to do this under “Pranayama” below.

Note how internally rotated the standing leg is in the above photo and how far behind the ankle her knee is located. (photo credit 105f.com)

Our responsibility as yoga teachers is to help our students both build strength and control, and also tune in to their bodies to listen for clues to injury in its early phases. We are obliged to seek continuing education with experienced teachers who can help us “see” in a body when more or deeper is no longer better.

If you have a history of knee problems, Baker’s cyst, patella-tracking problems, it may all boil down to not stopping the thigh from internal rotation. If you want to heal your knee, you have to strengthen your hips. Or use your ass as a doorstop for your knee.

Did I over-stretch it?

One of the greatest damaging forces to tendons is compression, not stretching. All of our forward-folding postures press the hamstrings tendons against the bones of the pelvis and continually increasing the compression over time gradually increases the extent of the damage.

Many yogis hang in the back of the hip for standing postures with the hip joint behind the ankle. This misalignment puts a tremendous amount of compressive force on the hamstrings tendons against the bone. The issue is often not one of stretching the tendon as much as it is aggressively compressing it.

How do we stop the injury?

The first step in helping my students with PHT is getting them to understand that you can’t stretch out an injury like this. Imagine you are reading the Sunday paper and the top crease has a small tear in it. “Shoot!” you think. “My newspaper is torn. I’m going to grab both sides of the paper and pull them apart so I can get it to stick back together.”

That doesn’t make any sense, does it?

Most of us think, like we do about lower back pain, that the answer to healing an injury is to stretch out the pain. The solution to healing an injury like this is to stop tearing and micro-tearing the area and give it time to heal.

You need to glue the paper and leave it alone so that has time for the glue to dry firmly. That’s our number one problem. We can’t seem to leave the paper alone long enough for the glue to dry. We keep going back to it, “It is ready yet? How about now?” In this way, we keep re-injuring the damaged tissue.

Most of my students say. I don’t want to stop forward bending. It’s going to limit my practice! Here’s the truth bomb. You have a choice to limit your end-range hip flexion for four to six months or be in pain for over a year and have to limit your end-range hip flexion for four to six months then. Which one sounds better?

Understanding the Healing Cycle

The healing response in the human body is a predictable process of three over-lapping phases: inflammation, repair, and remodeling. After an injury, your body immediately rushes blood and white blood cells to the area to stop the injury and begin the healing process. The inflammation phase usually occurs during the first seven days following an injury. This part of the process is generally painful and accompanied by redness and swelling.

Next, the body begins the repair phase or proliferation (of new cells) phase. Here the body lays the scaffolding that will bridge the damaged tissues. The process in this phase of healing is called granulation. The body sends tiny tendrils of scar tissue across the breach to show the body where to lay the permanent tissue.

Granulation occurs around 6 to 14 days and the area immediately feels more stable. Pain and inflammation decreases and you start to feel better. There is a strong urge to return to normal activity around two weeks post-injury. This is where we make our biggest mistake.

We resume normal use of the area and the granulation tissue is not strong enough to bear the load.  I picture these granulation tissues like the tiny gossamer filaments of a spiderweb. Under normal use, the tender fibers tear and the body initiates the inflammation phase again.

If you can wait, if you can stop yourself, the next weeks of healing are the remodeling phase. Around three weeks after the injury, the collagen of the scar tissue laid during granulation matures and is constantly remodeled until permanent tissue is achieved. This process takes around 12-16 weeks, but some tissues can take up to 26 weeks to fully mature. Mark your calendar with these dates as points to check in with your own healing process. With this injury, you must limit end-range hip flexion for three to six months.

Enhancing Maturation

While most students can grasp this healing protocol, most of us forget to put in the time  to strengthen the support muscles of the back of the hip and the hamstring muscles and tendons. If we are going to prevent this injury from happening in the future, it’s imperative to also strengthen the tendons. A tendon is strengthened by loading the muscle and, thereby, the tendon.

I’m a big fan of Jules Mitchell’s progressive loading technique for healing PHT. Take your time with each of the phases of this loading technique. Give yourself a week or two with each exercise before moving on to the next. Remember the exercises can be done with your feet on an exercise ball, a chair, your coffee table or couch. You can also do all of the exercises in the Bridge Pose position and slowly move your feet farther away from the buttocks as your strength increases.

In addition to these tendon-toning exercises, you must immediately improve the way you use the muscles of your hip and the alignment of your body in one-legged postures.

Most of us under-utilize the deep six rotator muscles that stabilize in the hip and forget to fire the hamstrings to keep the body’s weight forward rather than hanging from the back of the hamstring tendons. I’ll go into the 26 postures from the Bikram series in detail below, but remember that the bones of the leg do their job best when they are lined vertically hip over the knee and ankle joints. The bones of the leg bear weight longitudinally much more effectively than horizontally or at an angle.

When the body’s weight is in the heel in a hip-flexing posture like Warrior 3/Balancing Stick, most of the body’s weight hangs from the tendon of the hamstrings muscles. When the leg is aligned vertically, the majority of the body’s weight is borne on the bones of the leg and the muscles and tendons of the leg simply stabilize your balancing body.

Can I heal my injury and still go to yoga?

Absolutely! Yoga benefits healing by increasing circulation throughout the body and giving you the opportunity to build muscular strength. If you’ve been overworking the hamstrings, I’m confident there are at least another dozen other muscles you can wake up and get them to do their fair share of the work around your body.

Increasing circulation speeds healing. We get the waste products out and the building blocks in. By increasing circulation you help your own body do what it does best: keep you healthy, active, and pain-free.

Your first rule of thumb in healing a sprain, strain, or tendinopathy: Don’t poke the bear. If you can feel it, you went too far.

I grew up in rural Vermont. We give directions like, “Turn left a half mile before the big, red barn.” That really is how you get to the Cabot Creamery, but sometimes you have to go too far a few times to figure out how to get there. The goal of the mindful yogi is to stop before you feel sensation: pain, pulling, stretching to the injured tendon. In the beginning, you’ll go too far a few times, but hopefully you’re a fast learner.

You have to stop the cycle of injury to the area. In biomechanics, this means no end-range hip flexion. Hip flexion refers to flexing or closing the joint of the pelvis/hip and the femur bones. In yoga class, this means no full forward folds for about a half year.

Healing and the 26/2

Please find below specific instructions to modify and/or moderate each of the Classic 26 postures.

Pranayama/Deep Breathing:

In Pranayama, you have an opportunity to practice strengthening the muscles at the back of the hip to prevent injury in the future. Stand with your feet together in front of a mirror. Side-by-side and touching or with a small gap in between for those with hip injury/pain. Look at your legs in the mirror. For most flexible people you’ll notice that the femur bones internally rotate and the kneecaps have a very slight inward cast as if you were going slightly cross-eyed.

Note: The more internally-rotated the thighs, the wider the gap will be between the knees. There are some students with a true “bow-legged” stance who will have a large gap regardless. This student is the exception, not the rule. Many students think they are naturally bow-legged when they just have weak hip muscles.

Internal rotation of the femurs is a prerequisite for a hyper-extended knee. If you can stop the femurs from turning inward, you will prevent the knee joint from moving beyond 180 degrees,effectively stopping hyper-extension.

The muscles that do this work are some of the deep six rotator muscles: the piriformis, the obturators, the gamellus, and quadratus femoris. They are also part of the base of the pelvic floor. These unsung heroes are some of the most important muscles that connect the legs and trunk. Take a look at them here. They’re very cool! Looking and seeing where the muscles insert and originate will help you understand what they do and how to find them.

Looking at yourself in the mirror, very slightly externally rotate your thighs. For some it helps to imagine you were turning the backs of your knees towards each other. What you want to see in the front mirror is a small movement of the kneecaps outward until they point straight ahead. It is a subtle, but visible movement. If you see gross movement, you’re trying to do it with your glutes.

Place your hands on your buttocks muscles. Relax them. Then place your first two fingers in the “gluteal fold” between your buttocks and the back of your thighs. Now contract there by trying to turn the backs of your knees closer together.

Those are the muscles we seek. Feel the way those muscles deeply contract underneath your fingers. Still having trouble? Ask your yoga teacher or a pelvic floor physical therapy specialist to help you find those muscles. Finding and strengthening and increasing the flexibility of those muscles will not only help with your ass pain, it’s also going to help you stop peeing your pants when you jump on the trampoline.

Pranayama deep breathing is your chance to practice contraction of those muscles so you’re ready later when we try to balance on one leg.

Pro tip: During Pranayama, contraction should be softened on the inhale and deepened on the exhale in rhythm with the natural movement of your pelvic floor.

  • Exhale breathing: pelvic floor, deep hip muscles, and abdominal wall contract.
  • Inhale breathing: pelvic floor relaxes and abdominal wall inflates.

Half-Moon pose:

In Half Moon, we continue to work on engaging the deep rotators. In this pose, you’ll create the contraction and hold it the entire side. Relax. Engage. Start left side. Repeat for the back bend.

Pro tip: Can you feel your hamstrings muscles engage, too? The hamstring and calf muscles are important counteraction of the strong quadriceps muscles at the front of your thigh. The traditional “lock the knee” cue means a Battle Royale between the muscles that extend and flex the knee. If both sides are equally contracted, you have a very stable standing leg.

Hands to Feet:

Pump your brakes, big time. This posture centers around complete end-range hip flexion. We are trying to fold the pelvis down completely to the thighs. Remember your rules? No end-range hip flexion for 3-6 months.

Mind the warm-up in this posture. Simply move the hips side to side. Some teachers have added a cue to their class to “Bend into the right knee. Bend into the left,” or “Walk in place.” Bending the knees applies a tremendous amount of compression to the hamstrings tendons and should be avoided in any case where the yogi has a history or suspicion of PHT. Do you remember the stat from the beginning? That’s 80% of the people in class. In other words, that cue is inappropriate for the general public.

There are two approaches to this posture with a PHT. Some teachers will tell you that you MUST bend the knees. There is no science-based evidence to prove this assertion is true. Depending on the location and severity of the injury, one may work better than the other for you.

  1. Straight legs: Keeping the legs and spine straight, slowly walk your hands down your thighs or to the floor until your body makes a 90-degree angle. Press your hands against your thighs to create traction along the spine. Stop at any point you begin to feel pulling on your granulating injury.
  2. Bent knees: Bend your knees and lower your upper body toward your thighs. If you are asymptomatic here, you may reach around and grab your heels. Proceed to depth with caution. Do not straighten the legs completely until the maturation process is complete and your injury does not bother you at any time.

The one absolute no-no is to come down into a forward fold with straight legs and then bend your knees. Imagine the hamstrings muscle like a rubber band that is attached above the hip joint and below the knee joint. When you flex the hip, it pulls the rubber band tightly over the hip and knee joints. If the tendon is already compressed against the ischial tuberosity and you bend your knees (picture yourself plucking the rubber band), you will increase the load and compression to the tendon and aggravate the injury.

Either bend your legs before you flex the hip or keep the knee straight and only flex the hip to tolerance. This same principle will apply in Standing Separate-leg Stretching, Standing Separate-leg Head-to-knee, and Paschimotthanasana.

Awkward pose:

Awkward presents another opportunity for you to practice the action of contracting the deep muscles at the back of the hip. I like to picture those muscles like a great big hand holding me from the outside of the hip on the thiPosterior Pelvis
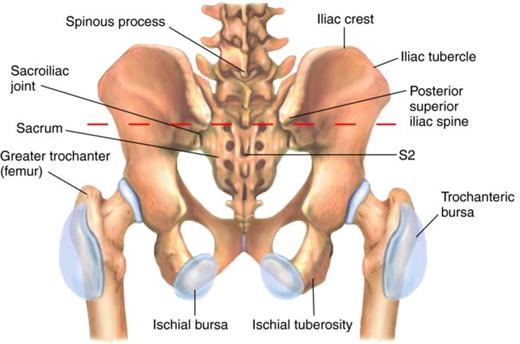
gh bone (the greater trochanter of the femur) to the bottom of the pelvis where you sit (your ischial tuberosities, pictured right). Imagine that hand, those muscles, pulling the femur and pelvis together, and closing or stabilizing the back of the joint.

When you sit down in Part One, instead of flaring your pelvic floor backward, try to pull the back of your hips together. It almost feels like you could pull your pelvic bones together. Again, it’s a small movement. If your knees fly out, you’re using your butt. If your tail tucks under, you’re using your psoas. Try to create a sensation like are lifting above the hip flexion, rather than sinking back into it. The movement of the deep hip rotators are subtle, but strong. Repeat this action in Part Two.

In Part Three, most yogis naturally engage the deep six on the way down. It’s how you keep your spine straight. If you’ve been pitching forward to come up, it’s because you’re under-utilizing these hip muscles on the way out. Before you come up, imagine you could pull your two ischial tuberosities (sitting bones) together as you lift your pelvic floor. You’ll have so much strength and control on the exit that it feels like you’re riding out on a geyser.

Eagle pose:

Don’t be surprised if you can’t hook your toes or sit very low in this one with a PHT. Depending on the location of the injury, the internal rotation required by the femur to hook the toes beneath the standing-leg’s calf muscle can twist and pull on the back of the leg enough that it can irritate the hamstrings attachment. Cross the legs and make sure you’re asymptomatic during the posture. Don’t poke the bear.

If it feels okay, go for it!

Standing Head-to-Knee pose:

Just like your teachers told you back in your first class, your standing leg is the most important part of this posture. For at least a couple of weeks, practice next to a side mirror and watch your body’s alignment. It requires the same engagement we did with double legs in Pranayama and Half Moon of that hand-like set of muscles of the back of your hip. Before you even shift the weight, engage the posterior hip muscles and stabilize your leg.

Look at yourself in the mirror from the side. When you stand on one leg, does your hip joint hang behind your ankle joint? Close the gap between the greater trochanter of the femur and the back of the pelvis/sacrum to keep your weight forward. See below. The picture on the left shows support from the muscles at the back of the leg and hip. The photo right shows a relaxed posterior hip and weight in the heel.


When you round down to grab the foot, and again when you start to kick forward, your weight will attempt to shift back into the heel. Be vigilant with these hip muscles and focus on keeping the weight forward so you don’t strain your healing hamstrings attachment.

When you are holding the leg with the tendinopathy in your hand, it’s OK for you to kick the leg forward as the hip will only be at 90° of flexion. Since this injury happens frequently with flexible students, you may be very easily able to straighten the kicking leg and still be asymptomatic. If it does hurt to straighten the leg, keep it bent for the duration of the healing process.

For flexible students: as you begin to round the spine over the thigh and bring your elbows down, keep the movement in your spine. Don’t proceed to end-range hip flexion by laying your torso on your thigh as this will increase the stretching and compression of the hamstring tendon and aggravate the injury. If you can get your elbows below your calves without feeling pain or pulling, you are more than welcome to drop your head on your knee.

Proceed carefully. It doesn’t matter if you can’t do this posture for a year. It’s better than living in pain and not being able to sleep at night.

Pro tip: When standing on the injured leg, try to feel the hamstrings muscles contract. In this way, you’ll be contributing to strengthening the muscle and its attachment so the injury doesn’t happen again in the future.

Standing Bow pose:

Utilize all of the work with the deep hip rotators that you’ve been working on since beginning breathing. As you begin to come down in Standing Bow, you are increasing hip flexion and compression of the tendon. You may need to execute this pose in a partially upright position. Mind your end-range hip flexion and proceed to tolerance.

Be vigilant in Standing Bow about the quality of your standing leg and prevent the weight from sinking backward and the knee from hyper-extending. As soon as you sink back, you are loading a damaged support structure and will only drag out the healing process.

Can you go down when you’re standing on the side that’s not injured? Sure!

Balancing Stick pose:

Come down only as far as you are asymptomatic. It is likely that your body will only come down to something like a 45° angle from vertical, maybe even less. The work you get to do here is contracting the hamstrings muscles so that even as you begin to introduce stretching back into your hammies, you’re doing it from a place of support and strength rather than hanging into the back of the hip. When you are lifting the injured leg, concentrate on deep contraction of those muscles, building strength as you heal.

Standing Separate-leg Stretching pose:

We approach Separate-leg Stretching just like Hands to Feet.

  1. Keep a flat back and bend your knees until you can touch the floor. Be mindful of your injury and slowly press your knees back to tolerance.
  2. Keep your legs straight and walk your hands down your thighs as far as your body goes without pain.

Pro tip: Many students find it helps to have something to put their hands on like the top of their water bottle or even a yoga block. That way they can practice weight forward, contraction of the back, legs and hips, without being tempted to sink down deeper into end-range hip flexion.

Triangle:

The primary concern for the injured hamstring is when it is the bent leg. Students should not be encouraged to sit down if it feels like pulling or stretching to the hamstrings attachment. It’s okay to stay up high and move the arms. For some students it’s impossible to move the arms and torso without feeling the pain. Start from the first cue the teacher gives and proceed only as far as you can asymptomatically.

Standing Separate-Leg Head-to-Knee:

This posture should be approached like Standing Separate-leg Stretching and Hands-to-Feet. Depending on the spot of the injury and the sensation the yogi feels, choose optoin one or two.

  1. Keep both legs straight and round the spine down like a candy cane as far as you can go without injury or pain and hold it there.
  2. Bend your front knee and place your hands on the floor. From there, keep the leg bent and curl the spine up towards the ceiling.

In my own recovery, I found both sets gave me different sensations in my spine and hips so I would practice one in the first set and the other version in the second set.

Tree pose:

In most cases, people are asymptomatic in Tree pose. If it pulls to lower and rotate the thigh, don’t do it.

Toe Stand:

In some cases, clients are asymptomatic in Toe Stand. Great!

If the forward fold creates a pulling sensation at the point of injury, simply repeat Tree pose.

Wind-removing pose:

Wind-removing pose is comfortable for most students because the knee is bent and torque on the muscle and tendon is reduced.

In a few extreme cases the student may feel pain simply flexing the single leg up. There’s nothing you can do about this but wait. In that case is I’ve had students simply bend the hip to a 90° angle and hold there.

Cobra series:

All the Cobra series postures require contraction of the hamstrings and hip muscles. These contractions stimulate circulation to the muscle area and build strength in tissue structures. Give it all you’ve got!

Fixed firm:

Fixed Firm is generally unaffected by PHT.

Half Tortoise:

Most students are comfortable in this pose.

Rarely, you may have a student with a very serious injury who needed to do a version like what you’ve seen in some Vinyasa classes called Puppy Dog pose. In this position, the shins are on the floor hips directly above the knees at a 90° angle and then you walk the hands out in front and drop the chest towards the floor. This allows the student to maintain some of the spinal traction and shoulder-stretching benefits of the posture, without aggravating their injury.

Camel:

Camel is another opportunity to strengthen the hamstrings, hips, and buttocks muscles with the same principles as the Cobra series.

Rabbit:

Most students are asymptomatic in this posture. Proceed in depth to tolerance.

Head-to-Knee pose:

This is a sticky posture for most students with PHT. Some feel pain when the injury is on the straight leg, for others when it’s bent. In the beginning, most students should simply sit upright and set the legs. Then, lift the arms overhead creating spinal traction and  begin to rotate towards the side. Most students will not be able to grab the foot early on. Arms can reach up over head for spinal traction or be placed on the floor on either side of the straight thigh.

Many students will feel pain if they bend the knee and grab the foot or if they round down. It’s more important that the student is asymptomatic in this posture than that they get the spinal flexion. Help the student to explore different parts of the ranges of motion  in this pose to see what they can do without feeling the pain or aggravating the hamstring attachment. This pose needs to be modified on a case-by-case basis.

Stretching pose:

One of the most challenging aspects of this posture is the set-up cue to “walk the hips back right and left.” For some students this pinches the hamstrings tendon between the pelvis and the floor and can be extremely painful. This cue should be skipped in students who are symptomatic.

Choose the start bent or start straight approach for Paschimotthanasana. The major principle here is no end range hip flexion and no pulling or pain at the point of PHT.

  1. Bend the knees and hold the feet with the spine straight
  2. Keep the legs straight, flex the feet, and sit up straight.

Spine Twist:

Most students are asymptomatic here, but you may get a few who have pain when folding in the bottom leg. Treat these students like you would a knee injury. Keep the bottom leg straight, foot flexed, and across the top leg over the knee.

Khapalbhati:

The client should be asymptomatic.

As you can see, at least half of the postures in the series are unaffected by the hamstring injury and all of them can be modified to accommodate the student’s needs for however long it takes them to heal this injury.

It may also be worth it to look into how your diet can support your healing. One of the strongest indicators of healing is albumin levels in the blood. This is a protein that is critical in healing process. Low-protein diet should not be attempted while healing an injury. There is also some evidence out there that certain nutritional supplements can support muscle and ligament healing. Consult with your doctor, functional nutritionist or naturopath to get suggestions for those products.

In addition, if you are experiencing tendinitis or inflammation and pain, it may be helpful to add foods to your diet that help to decrease inflammation. The powerhouse most folks know about is turmeric with black pepper. It’s in lots of really delicious foods, so why not add it to your fried rice or your coconut curry soup? Google is a great place to find more foods to add to this list like green tea, salmon, and blueberries. Healing an injury is it just the process of getting your postures right, but getting your mind right, reducing stress in your life, and getting plenty of rest. Pain from an injury like this is a cry for help. What other places in your life do you need support?

sara-fixing-knees.jpeg


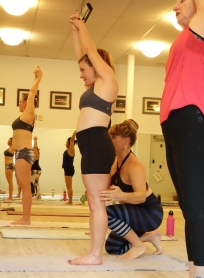
Sara Curry is a therapeutic Hatha Yoga teacher from Portsmouth, New Hampshire with over 15 years experience in the field. Right, she assists a student in activating her posterior hip muscles to prevent hyper extension. Look at that nice, straight leg!

I Hate My Yoga Teacher

Day One. I hate my yoga teacher. Anyone could be that skinny if all they had to do all day was workout and shop at Whole Foods. That bitch talked me into an introductory month. Why did I spend an extra $15 to listen to some immature twenty-something tell me about the meaning of life?

Day Two. Look in the mirror? I am sure you looooove looking in the mirror, bitch, with your $200 haircut. The mirror is just there to stroke your ego. Well, let me tell you what, I am not looking in the mirror. That is not what yoga is about. People who are in tune with their bodies should be able to feel their alignment. That’s real yoga.

Day Three. I still hate my yoga teacher. I have nothing in common with this woman. Don’t talk to a bunch of forty-year old women about aging gracefully while we’re trying to stand on one foot. What does she know about life anyway? I am sure her daddy bought her that Subaru and she must live off a trust fund to afford those $70 yoga pants.

Day Five. This asshole told me today that if I couldn’t get my leg around the first time to try again. What the hell does he think he knows? I know my body. I know what I can and can’t do. And I don’t know why these teachers are all suggesting when to drink water and when to not. Like I don’t know how to drink after four decades on this planet? What a bunch of militaristic dicks. It’s all about the ego with them. All they want to do is control us.

Day Six. I don’t even know why I keep coming back. This can’t be good for you. The human body wasn’t made to do these things. And the room! It must be a haven for germs. It can’t be safe to have so many sweaty bodies so close together. What is she doing going over to the thermostat again? Is that bitch trying to punish us for falling out of Standing Bow?

Day Eight. I swear, I’m only coming back to get my money’s worth. I paid $30 for the intro month and I might as well get as much use out of it as I can. It costs as much as a month at the gym and this is the cheap month! The bitch at the front desk told me my goal was to stay in the room to get acclimated to the heat my first class. I knew she was an idiot after two postures. I needed to get some fresh air. I don’t know why anyone else stayed in there. I mean, yeah, I got dizzy when I walked out into the lobby and had to sit down, but I’m sure that’s just because she had the heat turned up way too high. There wasn’t any oxygen in there!

Day Ten. The bitch was all tired at the front desk today. I am sure she was out partying with all of her friends last night. When I walked in, she told me she was glad to see me. Yeah, right. Despite the fact that I hate my yoga teacher, I didn’t leave the room today. I didn’t even think to leave. I was too caught up in the poses. I think I’m starting to get some of them. And I never got dizzy. They must have turned the heat down.

Day Thirteen. HOLY CRAP! I got my leg around in Eagle today! I never thought I would do that. I mean, NEVER! He said, “Try one more time,” and I did and I GOT IT! He believed in me before I ever believed in myself. I don’t know what he saw or how he knew, but HOT DAMN!

Day Fourteen. After last night’s miracle, I got up the courage to try the front row. Now that I can see myself in the mirror, I realize my left hip is always twisting back. That’s the one that used to hurt me in soccer. When I bring it forward, holy smokes the stretch!!! No wonder I was avoiding it when I couldn’t see in the back row.

Day Sixteen. Okay, she doesn’t have a trust fund. She is a lululemon ambassador and she gets those expensive pants for teaching free classes at the showroom on the weekends. I didn’t realize that they are always teaching when other people are not working: early, late, on weekends, on holidays. Still, I tried to ask a question after class today, but all of her friends were lined up to gossip after class. I waited twenty minutes, but no one seems to care about my needs, so I just left without asking. Of course they have never heard of “customer service” at a yoga studio.

Day Eighteen. Son of a gun. I guess their “suggestions” work. I didn’t drink water before camel today and for the first time, I held it the whole time, both sets, and didn’t feel like barfing! The bitch told me I nailed my Triangle alignment “spot on”, too. What, does she think she’s from London now?

Day Twenty-one. I think I am addicted. I didn’t come yesterday and I felt “off” all day. The teachers always say the only class you regret is the one you didn’t take. They couldn’t be more right. Class today felt amazing! I felt like She-ra, Princess of Power. I guess rest does help your muscles heal. I got my kicking leg locked in Standing Head-to-Knee. I can’t wait to try it again tomorrow.

Day Twenty-two. I was listening in as she talked with her “friends” after class today. The girl was complaining of a sore lower back and how she was trying to stretch it out, but it wasn’t getting better. Queen Bitch explained how you can’t stretch out back pain and that back bending is what actually heals it. We sit and forward bend all day, so more of the same will only get you more of the same. I’m glad I eavesdropped. My lower back has been tender for a week now. I am going to try out what she said tomorrow.

Day Twenty-five. No more back pain! I have been taking it easy in the forward bends and working my ass off in the back bends. I even get up during work to do a quick half moon and back bend once in a while. I haven’t felt this good in years. I thought that low-grade back pain was just something I’d have to live with for the rest of my life.

Day Twenty-six. I decided to stay after and wait until I got my turn tonight. My wrist has really been bugging me and it’s affecting my typing. After the back pain realization, maybe she can help me with this. I waited until 8:40 pm. Turns out, those people I thought were her friends are students waiting to ask questions about themselves. One women was even talking all about her dog’s knee surgery for, like, ten minutes. As I left the studio at 9 pm, my yoga teacher was walking into the laundry room to finish washing and folding towels. Her class ended an hour ago…

Day Twenty-nine. My intro month ends tomorrow. I can’t stop now. I am going to sign up for automatic billing. It really is the best deal. And this is like paying for the gym, therapy, chiropractic and a doctor’s visit all in one and I can come every day. I actually came twice yesterday. I got up to take the early bird and had such a terrible day at work that I needed it to de-stress before going home. The guy I used to call “the asshole” mentioned to the class what dedication I had book-ending my day with yoga. Me? Dedicated? I have always thought of myself as a quitter, but I guess I am.

And my wrist is feeling much better. Turns out I had my elbows bent in Locust and my wrist was twisted when I was lying on it. I thought it was more important to get them under, even though she said, “Be sure your elbows are straight.” I wonder how many other cues I’ve misinterpreted.

Day Thirty-four. I learned today that my yoga teacher had a miscarriage three weeks ago. She came to work two days later, tired at the front desk, but she still had a smile for each of us. She told me she was glad I was there. I remember, she even said,”Is that a new top? It really brings out the color of your eyes.” When will I learn, you can’t judge a book by it’s cover?

Day Thirty-nine. A couple of the people from yoga invited me out for tea after class this weekend. How cool. I didn’t realize I was making friends in the locker room, but I feel so comfortable around these women. We had tea and a delicious, healthy lunch after a killer class. I feel like I’m walking on air right now!

Day Forty-five. I thanked my teacher today. I know I should have done it earlier, but the weather was crappy and lots of businesses were closing early, and my teacher volunteered to stay so that those of us in the 9-5 grind could get a class in a the end of a long day. I know she had a long ride home on snowy roads. I said, “Thank you for being here.” “Happy to,” she said. Could she really be happy being in service to others? I needed that class today.

Day Sixty-four. I haven’t been posting much lately. I am too busy feeling good to complain. I am just so lucky to have found this studio, this community and these amazing teachers. I have become a better person just by taking classes here for two months. Who would have thought?

Day Sixty-five. And I forgot to mention: I love my yoga teacher.

sara and bella headstandSara Curry is a yoga teacher and studio owner in Portsmouth, New Hampshire. Through many years on the mat, she has learned to love each and every one of her yoga instructors from a wide variety of disciplines by first learning to love herself.

Why do some yoga poses hurt?

Yoga should never hurt.  

Your back is gonna hurt like hell.

Ask any teacher and they’ll give you a strong argument about why one of those answers is correct. With the myriad of bodies and experiences we see on a daily basis, a yoga teacher learns quickly that as we think there is only one right answer, we couldn’t be farther from the truth.

I like to say, yoga should never hurt you. It should never be damaging to your body. That doesn’t mean it doesn’t hurt sometimes.

How do you know when yoga is healing or hurting?

We often confuse pain and stretching

Yoga is all about getting to know you.  Your body. Your mind. Your Self. Much of our daily lives revolve around ignoring the way we feel so we can get through the day and get our work done. We ignore our aching hips on the two hour commute as much as we avoid movements that remind us of what it feels like to live in this body.

When we first start to move every part of our bodies in yoga, the sensations are unfamiliar and we can frequently categorize the uncomfortable sensation of stretching or moving a joint through full range of motion as pain.

Backbending when you haven’t done it in twenty years hurts. Clearing mineral deposits from your elbows hurts. Tensing up when you are trying to stretch hurts. Bringing back full range of motion to a hip that only sits in a chair or a couch hurts.

Ask yourself, is this pain or the sensation of stretching?  As a general rule, pain means stop and discomfort means go.

Sore muscles become stronger muscles

Muscles need stress to become stronger. One of the side effects of that stress is delayed onset muscle soreness. While it is certainly possible to over-exert yourself in yoga, DOMS is a natural part of increasing strength. This form of discomfort initiates within 24-48 hours of exertion and should resolve itself within three days.

Tolerable sore muscles mean progress. Don’t be scared.

Cramps

Our brains are designed to seek avoidance of anything that causes us discomfort. Cramps are no exception to this rule. Inadvertent and strong contraction of muscles in a cramp can be abruptly painful. It causes us to immediately cease the activity and often violently avoid the sensation.

There are three main causes of cramps, excluding medications and preexisting conditions:

  1. Dehydration. This is a serious condition and is accompanied by a host of other symptoms like the inability to uncurl the fingers, vomiting, confusion and difficulty breathing. Individuals who are dehydrated need immediate intervention. This is not the cramp you get during cobra.
  2. Mineral deficiency. These cramps are generally not experienced during exercise. Nighttime leg cramps can often be attributed to a deficiency or imbalance in calcium, magnesium or potassium. Talk to your healthcare provider about an appropriate supplement if you experience nighttime cramping.
  3. Exercise intensity. Dr. Martin Schwellnus proposes that as you increase the intensity with which you are using a muscle, it can take time for the brain and body to synchronize, resulting in over-contraction of the muscle. This occurs particularly when the muscles are fatigued. This period is known as “altered neuromuscular control” and was originally theorized because studies have shown no correllation between hydration and electrolyte levels with muscle cramping in extreme athletes.

The first two causes of cramping rarely apply in a  yoga class. This leaves us with muscle fatigue and exercise intensity. We often seek muscle fatigue to get a muscle to “let go” before stretching it, so the cramp is a sign we are on the right track, just maybe a little to far too fast. Deepening muscle strength through increased length or intensity of contraction can, at times, be accompanied by cramps.

As unpopular as this may make me, I am a fan of cramps in class. It means I’m doing something new. Going somewhere I haven’t before. Finding new depth or strength I didn’t know I had.

Keep your breathing regular and slowly decrease your intensity and watch that cramp melt away. In a nutshell, cramps in class are not dangerous. Don’t panic.

Rusty hinges, adhesion and scar tissue

After we finish development, it is use it or lose it with range of motion and flexibility in the body. In our adult lives, we sit or stand in the same position for hours at a time, sometimes a majority of our day. It is a rare individual that uses their body through full range of potential movement each day. Most people use much less than even half of potential movement.

Joints that aren’t used through full range of motion are the perfect place for calcium oxalate crystals to deposit. This is a painful form of arthritis. As a rolling stone gathers no moss, so a moving joint keeps surfaces clear from crystalline arthritis. Clearing mineral deposits from the joints is not always a pleasant process. Take your time. It will get better.

Muscles that remain tightened in the same position for long periods of time can form hydrogen bonds between the muscle fascia that get more dense with time. Stretching those long-bonded filaments of connective tissue, like moving a crystallized joint, can feel much more intense than simple “stretching”. Again, move slowly, but don’t be afraid.

Scar tissue forms when the body heals from an injury. Scar tissue cannot be eliminated, but it can be remodeled. Through movement and stretching, one can realign the collagen fibers in the lumpy scar tissue so that it is both stronger and more plastic. Through this process, the scar tissue begins to act more like the original, flexible tissue that was in place before the injury. The older the scar tissue, and the more trauma to the area, the more uncomfortable this remodeling process can be.

On the mat, the yogi should practice with awareness and patience. When we want to achieve yoga “goals” too quickly, we can cause injury. Take your time. Move with awareness, and be patient. Start where you are and build strength and range of motion from there.

Osteoarthritis

Osteoarthritis is the condition in which the protective cartilage in a joint is worn down, eventually to painful bone-on-bone contact within a joint. Osteoarthritis generally forms from uneven tissue-loading or repetitive movement. There is no cure for osteoarthritis, but yoga is a great tool to help strengthen the soft muscle tissue around the joint and reduce the amount of painful bone-on-bone contact.

In the practice of yoga, individuals with this condition should focus on precise alignment of the skeleton in poses and building strength around the joint. Range of motion exercises are helpful because they help palpate the circulation around the joint, maintaining and improving joint health. Individuals with osteoarthritis must practice to tolerance only.

Once the painful bone-on-bone compression is felt, going deeper will only exacerbate the wear and tear on cartilage and bone. This is not a pain to try to tough your way through. Through practice and attention you will find the places where you need to stop before you reach the pain.

Chronic Illness

Fibromyalgia, rheumatoid arthritis, lupus and other autoimmune disorders are often noted for unsourced, chronic pain. Practicing yoga with these conditions hurts. That’s the cold, hard truth.

The good news is that yoga also miraculously relieves the long-term pain. There is no clear explanation of why, but moving the body with awareness, increasing circulation, improving alignment and strength all help to eliminate the seemingly endless pain. Read more about Joseph Encinia’s inspiring recovery from RA.

Other forms of chronic illness are also notorious pain producers. Sometimes it is being unable to move for long periods of time or the way we hold ourselves in response to the illness that causes pain.

Take your time and move slowly, but get started with yoga. The body functions best when it is being used and yoga is one of the safest ways to find the limits of your body in any condition and begin to improve your health.

Chronic Misalignment

Duck-footed. Hunch back. Sway back. Ding-toed. Flat foot. Forward head.

These common misalignments are not in the original design template of the human body. “My father was duck-footed” is not a genetic precursor for you to turn your toes out. The human leg was not designed to be used in that way. We learn postural habits from our surroundings just like we learn syntax and social cues.

Some of these misalignments are caused by accident, injury or habit. You may have developed a habit of jutting the ribcage forward at the beach to appear thinner or have a forward head from working at a computer desk all day.

The most insidious component of chronic misalignment is uneven tissue load. Take this valgus, or abnormal rotation, of the heel below. Misalignment of the heel causes adjustment of the bones of the entire leg, hip and eventually the pelvis and spine. Uneven load in the tissues over time leads to failure of the muscle or tendon fibers. This flat foot might just be causing your migraine headaches.

As you work to change chronic misalignment, you may experience discomfort and pain. This is part of the process of realigning bones, strengthening muscles and healing connective tissue. With this type of pain, it is important to have a strong team of therapists helping you through the process to ensure you stay safe, progress at a rate appropriate for you and practice with a depth and attention to alignment that is not causing you further damage.

A good team includes experienced and educated yoga instructors, massage and physical therapists, maybe even a chiropractor, doctor or sports medicine specialist. Check out Dr. Mike Evan’s video on chronic back pain for more information on diagnosing chronic pain, creating a team and developing an attitude that will help you to heal.

You have bad alignment in class

I know it. You wanted me to say something nice. You expected something more supportive, and all you got was tough love. Get ready for more real talk.

Your alignment sucks.

I hope that is bold enough to get you to make a change. Your teacher said your foot should be pointing straight up over the top of your head in Standing Bow. Yours is pointing over at a boat moored across the river in Kittery and you are surprised your sacroiliac injury isn’t getting better?

You want to go higher in floor bow, so you leg your legs spread three feet wide. Yoga must be bad for knees.

You want to come down lower in half moon, so you turn your chin, twist your spine and collapse your chest. I guess yoga causes neck injuries.

You keep losing the grip, so you use a towel to augment your hand strength. Ah! It’s yoga, not tennis that causes rotator cuff injuries. Phew!

Or are your ready to take responsibility for your actions and use yoga to change your body and your life? There are very specific reasons for the way your yoga teachers cue the postures. The sequence of the cues is critical. The words we use intentionally to create specific actions in your body to keep you safe, and to help you maximize the therapeutic benefit of your practice.

Here are the steps to achieve a healing practice.

  1. Frequency: You have to show up. Regularly. Not once a week you show up and work so hard you pass out, puke twice and have to go home and take a nap. Regular, consistent, dedicated practice. You are worth it.
  2. Accuracy. Alignment is the first priority in any pose. Even if you can only move one inch into the pose. With no alignment, there is no therapy.
  3. Intensity. Only when you are showing up regularly, and executing the postures with accuracy and precision in your alignment, do you add the intensity and depth. Intensity is the privilege of the mindful practitioner.

Intensity is the privilege of the mindful practitioner.

Injury

Injuries happen in life. We slip on the ice, aggravate a shoulder playing tennis or get too aggressive in a pick up basketball game. With few exceptions, a modified practice can be continued with an injury, but pain will be an important guide.

Last year, we had a student practicing with a broken leg. She did her practice in a chair for the standing poses and elevated the leg on the floor. After two weeks, her doctors told her the leg was ready for weight-bearing. After four weeks, the fracture was invisible on an x-ray. Her doctors were blown away by the speed of recovery for a woman in her fifties.

One of the main reasons yoga helps you to recover from an injury is blood flow. Increased circulation helps support and speed repair and rehabilitation. The tricky part is not letting a misguided ego tell you to go for it in floor bow even though your shoulder bursitis is bothering you.

The most important action to take when you have an injury is speaking. Talk with your doctor or physical therapists when they analyze or diagnose you. Ask questions like, what types of movement should I avoid? And, what movement should I do to rehabilitate from this injury? Many students bring in a printout of the poses they have questions about. Get specific and don’t leave without an answer. You may be the first patient they have had who really wanted to know.

Talk to your teachers. Any well-educated teacher has yoga therapy and yoga for the infirm in their training profile. They can’t help you with your whiplash if they don’t know your neck is bothering you. You are not a yoga expert, so you may not realize that forward folds are aggravating your herniated discs.  You might be great at aerodynamics or flag football. Let your teachers share their expertise and experience with you.

I can’t tell you how many students have complained that an injury was not healing and when I asked them to take it slowly or avoid a particular movement temporarily have replied with, “Well, I like to push,” with a cheeky smile. Apparently, you also like to stretch a twelve-week recovery out to eighteen months.

Bones take four weeks to heal. Muscles take around six weeks. Connective tissues can take up to sixteen weeks. The average woman recovers from a common yoga injury to the hamstrings tendon in eighteen months. Talk to your providers and listen to your body so you don’t end up in unnecessary pain for years.

Over-Aggressive Practice

This could be a sub-section of the injuries category. Like all physical activities, you can create injury in yoga. Yoga has tremendous therapeutic potential. It can also cause harm.

We see it and want to achieve it. We know if we work hard, we can pull ourselves up by our  bootstraps yoga mats and live the American yoga dream.

I hope you listen to what I am going to say next.

Too good is no good.

More is not always better for the human body. You might not be strong enough yet for headstand. Your body may not be genetically designed for full wheel. You can cause wrist injury by misalignment in handstand. Shoulderstand is not for people who have osteoporosis.

This kind of pain is the devil in the world of yoga. This kind of pain is not the walk-through-the-fire-and-emerge-clean kind of pain. This isn’t the suffering that leads to redemption. This is the antithesis of yoga: disunion of mind and body.

When you are in the posture, with healthy alignment, to the best of your ability today, that is the ultimate destination of yoga. It is meditation in it’s purest form: the mind in the body, one second at a time.

Take your time. Ask questions. Be patient. When we approach pain with awareness, we realize that in the words of the great Emmy Cleaves, “Pain is a gift.”

sara headshotSara Curry is a Bikram Yoga studio owner in Portsmouth, NH. A lifetime of back pain lead her to yoga at the turn of the millennia. The freedom and recovery she gained from yoga drives her daily practice and her determination to bring yoga’s healing potential to as many people as possible.

So long, SI pain!

Good god, Jim! The last time I felt like this, Cynthia and Ky had come to do Advanced with us after winning the International Championship in 2007. It was the first class I felt like I was making progress in my body, not just surviving or recovering. Not only can I pick up my foot in Standing Head-to-Knee, but I can put my head on my knee at 6:30 am.

Bella was about 18 months old at the time. We have some really cute pictures of her in class with us and her soggy diaper. It was the first time I felt like I could actually try in Guillotine without dislodging my sacrum on the left.

My strength is back. I have control over my abdominal muscles. I can actually hold Peacock and Cock and Lifting Lotus. I really never anticipated that I would take so long to get back to those places. The first time I tried Peacock postpartum it was like I had never done it before.

Cock? Postpartum, I was back to being able to lift my Lotus up only a half an inch! I remember sitting down the day after Bella was born and leaning forward. My rectus abdominus actually folded in half! My only consolation was that I knew I had done it before, so I knew I would get there again.

My flexibility is progressing. I can finally push in Hands-to-Feet, Tortoise, Rabbit and Frog. For nearly five years, every time I would try to go deeper, it would cause that horrifying sacroiliac pain. The chiropractor helped me to get my sacrum level again in 2007, but tight psoas and piriformus kept straining the joint.

I have to credit Emmy Cleaves with resolving my SI and hip problems. When I saw her in November 2010 at the Women’s Retreat in Orlando, she helped every woman in the room with hip pain. “If you have a chronic pain in the hip, it can generally be traced to Triangle.” She corrected each and every one of us. She sat right on me. Rode me like a donkey.

The only correction Bikram has ever given me was to push my hips more forward in Triangle. Laura always corrects me to get my hip forward, but I never got it until she showed us all of the pit falls. I’d get my hip forward, but my whole torso would come with it. I’d get low enough, but I’d have tilted my hips in the set up. More often than not, I just wasn’t pushing my left hip forward because my psoas was too tight.

Since then, my pain has been slowly diminishing. I stretch my hip flexors and piriformus every single day. Now that I bring my attention to them, I can feel how tight they are in Half Moon back bend and Camel. My hips have been sore for about three months. In a great way. Like I’m doing double sessions for rugby. Triangle is hard as hell every single time.

I’ve also been seeing Paul Caswell at Performance Muscular Therapy in Portsmouth. Absolutely amazing. My first visit, I thought I was going to jump up off the table and punch him. Or maybe just bawl my baby blues out.

I knew I had tight hips, but I had no idea I had so much garbage in my hamstrings and quadriceps. By the third session, the massage to my legs and hips just felt like a deep massage. I was shocked by the absence of pain. Gives me hope for the future. I conquered the back pain in 2004 and the hip pain in 2011. Namaste, BABY!

Breastfeeding and Bikram Yoga: Postpartum Concerns

I’ve had a lot of questions from students lately about postpartum recovery, breastfeeding, and Bikram Yoga. This pose will address a lot of those questions.

When can I return to yoga?

Most physicians recommend you wait at least three weeks postpartum before resuming yoga to allow your pregnancy hormone levels to drop, as they do dramatically at two weeks postpartum, and stabilize.  Some want you to wait six weeks until the placental scar is fully healed. With that said, who wants to look at their postpartum body in the mirror with a pad stuffed in their spandex? You may want to wait until your flow is reduced to panty-liner levels.

You’ll also need to take into consideration how you are feeling, sleeping, and recovering.  If what you’re doing causes your flow to increase that is a sure sign you are doing too much, so slow down. Personally, I returned to classes five and four weeks postpartum with my two pregnancies, but had been doing some yoga in my living room since three weeks PP to help alleviate the Hunchback of Breastfeeding. As long as you are practicing with mindfulness, yoga is an adaptive practice you can make safe at any time.

Benefits

Your yoga practice is a wonderful tool to return you to your body. Not just your pre-pregnancy weight, but to help your spine, joints, hips, rib cage, and abdominal organs return to their normal places, sizes, and alignment. Your practice will help straighten your posture as you strengthen your back and abdominal muscles against the common pregnancy kyphosis (hunchback) and lordosis (sway-back).

Pregnancy is hard on your body, but so is having an infant. It is difficult to find time for yourself and you spend most of your day in ergonomically-compromised positions.  When you’re not hunched over changing diapers and cute little onesies covered in the latest blow-out, you’re hunched over breastfeeding. If you’re not hunched over, you’re probably lugging a car seat over one arm or wearing baby strapped to your body in a wrap or a sling. When you’re not doing that, then you’re probably on the toilet trying to pee and simultaneously breastfeeding and talking on the phone while contemplating what you can stuff into your gob because, Damn!, this breastfeeding makes you hungry. If you formula feed, then kudos to you because you have to wash bottles in the middle of all of this. Your yoga can help to keep you strong so you don’t suffer the aching back, sore neck, and headaches that plague a lot of new moms.

In addition, the practice gives you an incredible endorphin rush that helps to improve your mood. Simply being able to take a couple of hours to yourself, for yourself, by yourself, when no one needs something from you is critical to make Mommy a happy, loving, productive mommy. After my son was born, I remember thinking one day, “Do I have postpartum depression?” The next day I took my first class back and was on top of the world. It’s amazing what a little time to yourself and some exercise can do for you.

Loose Joints

The hormone relaxin that helped your body get ready to open and stretch your pelvis during delivery remains in your body for nine months postpartum. The levels reduce significantly in the first six weeks, and continue to diminish over the first nine months. Relaxin softens the ligaments in your body. Ligaments hold your joints together. Looser ligaments means looser joints.

To be clear, this looseness means your joints are not held together as well as they used to be. It does not mean you will be more flexible.

What this means in your practice is that you’ll need to be aware of the limits of your joints for nine months postpartum. As women, we tend to be more flexible than men and can often skate by in class on our flexibility and put a lot of extra strain on our joints.  This is detrimental to the body (postpartum or not) and now is a good time to erase those bad habits. Instead, concentrate on developing the strength in the muscles that support the joints, especially the weight-bearing joints. This is particularly important in one-legged, standing balancing postures. You must equally contract the quadriceps and hamstrings muscles over a straight knee joint to “lock” the knee. They antagonize each other and result in a strong, stable knee.

It is common (but not normal) for women to experience discomfort in the sacrum and hips after pregnancy. Good chiropractic care can help with any misalignment caused or exacerbated by your pregnancy, but good practice in the yoga room can help to support this area as well. In backward bends, firmly contract the hip muscles to support the sacrum and stabilize the lower back. Don’t try to push through pain in the sacrum in deep back bends or forward bends that rely on strong flexion of the hip joint, and don’t over-do it in hip flexibility exercises like lotus and pigeon before nine months postpartum.

Weak Abdominals

Your abdominal muscles are not just weak from the activities and exercises you couldn’t do while pregnant, but also because they were just stretched over a huge watermelon for nine months. It takes time for them to contract and retract to their normal length, then they still have to strengthen from there. You may notice when you completely relax them that it looks like there’s still a grapefruit or a cantaloupe sitting in there. Be patient. They will tighten up. Concentrate in class on really pulling in on your abs in all of the poses. Picture your abdominal muscles pulling the four corners of your belly (top two hip crests and the bottom of your ribs) together toward your belly button and back toward your spine. This should get them to engage like you want.

It may not feel or look like much is happening, but it’s repeating the action that leads to strengthening and results whether you can see it today or not. The only posture you don’t use the abdominals in is wind-removing pose.

You may also notice that postures you didn’t realize your belly affected are significantly harder. The abdominals stabilize the lower back. When they are weak, this makes postures like balancing stick and locust much more difficult. They also flex the spine and rotate it. You may find your depth is limited or more challenging in the head-to-knee postures, rabbit, triangle, spine twist. Again, don’t worry. It’s hard, but its just what your body needs. Remember, you’ve got to have a strong belly to avoid the postpartum back pain that so many women suffer unnecessarily.

Breastfeeding

Once baby can go 2-3 hours between feedings or is taking a bottle, you can resume your practice (with the support of your care providers, of course). You’ve probably already learned how much more water your body needs when breastfeeding. The same applies in the hot room. This is not the time to test your mental strength to refuse water. You may not need it mentally, but your body is making milk the whole time and needs water to fuel the process. Make sure you’re drinking a minimum of 16 ounces of water in class and more before and afterward. This may require you to have certain points where you stop and remind yourself to take a drink.

But they’re sore! Your breasts, I mean. It takes six weeks for a breastfeeding mother’s fluid levels to stabilize (in the entire body, not just your breasts). That’s why pregnancy-induced carpal tunnel syndrome bothers women until then and why the bra you bought when your milk came in is a little too big when your baby is two months old. Your breast size increases due not just to milk production and mammary glands, but also because of inflammation in your breasts in the beginning of each new nursing experience. Even for mothers who nursed a toddler their entire pregnancy. As this recedes, the soreness in your breasts usually follows and you can return to normal execution of the postures.

If they’re sore and you can’t lie on them, do the pregnancy Savasana or even the pregnancy modifications for the belly-down series. Some women with recurrent blocked ducts, mastitis or supply issues may need to do the pregnancy Cobra series for the entire breastfeeding period. If you’re not bothered, you can try the Cobra series, but may want to start the postures on your elbows while the rest of the class sets it up. Continue like this until your breasts are no longer sore.

Losing Weight

Whether we want to admit it or not, we all want to lose the “maternal fat stores” from pregnancy. Madonna used a regimen of Bikram Yoga to lose the baby weight from her pregnancies.

It is a rigorous series and burns a lot of calories, so it makes sense to use it to aid you in your quest. Online calculators and testing done at Stanford University indicate a per-hour calorie consumption during Bikram Yoga of 350-650 calories for a 150 pound woman. More in-depth study done in 2013 at Colorado State University showed the level of metabolism during class is closer to 330 calories per class. If you are breastfeeding, please remember that it is not recommended that you consume less than 1800-2400 calories per day without adverse effect on your supply. On the days that you practice, you will need to supplement your food supply to reflect an additional 300 calories at a minimum.

With that said, for some women, the weight falls off them while breastfeeding. For others, they hold onto their fat stores the entire time they are nursing. This seems to be a genetic phenomenon. If you’re eating well, exercising and not losing please be easy on yourself. There’s not much you can do about it. You’ll be rewarded in long run by all of the benefits your children receive along with your sweet milk.

Pregnancy Blog: Nine Months Post Partum

They say you won’t feel yourself for nine months postpartum and it is so true. I am just starting to feel like I have the strength, flexibility and energy that I used to have.

I actually forgot that I used to feel like this. The no-sleep does a number on your flexibility and makes those early morning classes so much more painful.

On the reverse side of it, it makes me remember why this yoga is so good.  The “therapeutic” is pouring out of every posture. I am really looking forward to the 30-day challenge, simply for the opportunity to make yoga a priority again. To give myself a good reason to get up at 5:30 am for yoga when I was just up at 4:30 nursing. Maybe she’ll be sleeping through the night by then. Ha ha ha. If she’s only waking up twice I’ll be ecstatic.

I read the other day that the average mom sleeps 3 hours a night for the first nine months and then 5 hours a night the next two years.

What can you do but laugh?

Pregnancy Blog: 36 Weeks

Ready to Rumble

Everything is right on track. She is head-down, measuring well and still kicking like crazy. All of the pregnancy books say to expect a decrease in movement in the last month. Not this little girl. She’s more active for longer periods of time and her movements have gotten stronger. It’s so crazy to watch an elbow or a knee slide across my abdomen. There’s a little alien in there.

Did someone slip a sleeping pill into my food? I can’t believe how tired I am. By 2 pm everyday I am ready for a power nap. My husband, Jaylon, and I were getting into bed a few nights ago and I said to him, “Can we really go to bed at 9 pm?”

I lost weight this week, so I am back to trying to pump up my meals. There’s just so little room in there. I eat half my dinner and I’m done. I am back to eating every 2 hours like the first trimester and trying to pack in the calories and nutrients. She measures on the small side of average, which isn’t bad, I just want to be sure she’s getting everything she needs. Given all of the watermelon babies with gigantic heads that have been born into my family, I’m not too sad she’s going to be an average-sized peanut.

Yoga wise, let’s see…One of the hardest things for my ego to stomach throughout this pregnancy has been my loss of strength. I’m just not as strong as I used to be.  Once I hit the third trimester, my abdominal muscles were so stretched out, they are pretty ineffective. I can’t really get up into Headstand because I don’t have the abdominal control to pike up there. I remember when I started the pregnancy modifications thinking that Hand-to-Big-Toe was such an easy replacement for Standing Head-to-Knee. Now it is getting harder to hold it the whole time. I am just more tired in general in class. I feel worried that I’ll never get it back.

Oh, I almost forgot. I remember asking my friend and fellow yogi, Jenn, when she stopped doing Savasana on her back. “You’ll know,” she told me. Now I know what she meant. When I try to lie on my back during class, I feel too much pressure, like I can’t get a breath in. So, it’s strictly pregnant lady Savasanas on my side for now.  Also in Eagle, I have had a harder and harder time getting my foot to wrap around.  I feel it all in the ligaments in my groin and it just won’t go.

Four weeks to go…maybe… Smile


Pregnancy Blog: 34 Weeks

Yes, I’m still practicing

I can’t tell you how many people have asked me that question. I can’t imagine going through a pregnancy without yoga. It has helped me adapt to my ever-changing body and gets 100% credit for getting a former back pain-sufferer through pregnancy with zero back pain.

It feels good.  My hips have definitely gotten tighter during the third trimester so it feels good to get in that hot room and stretch.  My new best buddy is Pranayama.  I’ve started doing it every morning when I wake up.  It gets me alert much faster and reminds my body how to breathe deeply.  I can finally get my lungs off the baby and take a deep breath.  I feel for women who haven’t practiced Pranayama-type breathing because as this baby gets bigger, I have to breathe into my chest.  There just isn’t any more room in my abdomen for my diaphragm.

We talked with our midwife a few weeks ago about birthing classes.  She said, “To be honest, everything you learn in a birthing class, you already practice every day in yoga.”  Staying focused and calm through challenging moments, rhythmic, slow breathing, endurance, meditation, etc.  The only thing she recommended was a hospital tour.

It’s amazing to me how many woman have said to me that I should keep in mind getting an epidural.  When I’ve said I was interested in natural childbirth, I’d say 75 percent of women have told me that’s crazy and to be ready to take the drugs or there’s no reason to feel the pain, etc.  It’s pretty incredible that that has become the absolute norm in our country and at the same time we have complications rates similar to most third world countries.  We’ll see.  I’ve never done this before, but I have to believe that positive thinking and faith in myself can only help.

I think the hardest part now is waiting.  Maybe that’s been the hardest part all along.  I can remember at 16 weeks, thinking that at 32 weeks I’d almost be done.  Now, here I am at 34 weeks and the end seems so far away.  It’s like waiting for Christmas morning for eight months.

Pregnancy Blog: 30 Weeks

Relaxin

Now it’s all making sense.  So much that I had read about pregnancy and relaxin is finally happening in my body. Relaxin is the hormone that softens a woman’s ligaments so that the pelvis is more malleable and can accommodate magnificence of the human head at birth.

A lot of the postures that we teach students to modify in the pregnancy series I haven’t had to modify (except to accommodate my belly) at all until now.  It seems like in a week, my whole pelvis has changed.  I went from comfortable doing Toe Stand on Friday to “what am I thinking?” on Sunday.  I can see why they say to avoid excess pressure to the perineum and symphysis pubis.  It feels like my symphysis is going to crack open if I put too much pressure on it.  Now I know why they encourage you to do Kegels from the beginning.

I can really feel the effects of the softening in my ligaments.  In straddle splits, there is a point where my muscles are no longer stretching and I can feel I am just pulling on my ligaments.  It actually feels like my ilium are spreading away from my sacrum when I fold too far forward in it.  When I pushed it too far, I felt like I’d been riding a horse too long for the rest of the day.  I’ve noticed, too, when I do Forearmstand, that I have INCREDIBLE stretching across my abdomen that just doesn’t feel right.  I just don’t feel in control.  I am sure some of that has to do with the lengthening of my rectus abdominus…it just doesn’t contract like it used to…

It really is inappropriate for any pregnant woman to do Toe Stand and deep straddle splits during pregnancy. It may feel okay in the beginning, but contributes to instability in the ligaments that stabilize your entire body and can lead to long-term problems with the sacroiliac joints. I have always been very strong and was very pig-headed about dialing back my practice. Although it feels never-ending at times, pregnancy is a tiny period of your life. You’ll get back to all of your favorite poses before you know it.

Other than that, I am really just in the grow-the-baby stage.  She’s gaining weight and getting bigger, kicking up a storm.  She loves hot chocolate.  Some times it looks like an alien is rolling over under my skin.  I wish I could see what she’s doing in there.

Pregnancy Blog: 26 Weeks

Cruising Altitude

Things are pretty uneventful lately.  I feel good, the yoga feels good, I have plenty of energy and a good appetite.  Things are right on track.  She’s a good size and developing well.  She has gotten incredibly active.  I used to feel her just at night or very quiet times during the day.  Now I feel her kicking and rolling all day long, especially during class and after backbends.  She used to be quiet the whole time I was teaching, now she’s kicking me while I’m talking.  The one part of class that completely mellows her is Kapalbhati.  I don’t know if its the motion or the rhythmic squeezing, but I don’t hear a peep from her for about an hour after we’re done.  Even when I am just demonstrating or joining the group while I’m teaching.

Her favorite place to plant a kick is right in my liver.  I am happy, though, that she’s on that side because if she were reversed, I’d be seeing my lunch again as she jabbed me in my stomach.