a.k.a. Yogic Butt Pain
The most prevalent injury in the field of yoga is proximal hamstring tendinopathy (PHT). You may know it better as a deep pain in the butt, right where your leg and pelvis meet. It is also commonly referred to as hamstrings attachment injury.
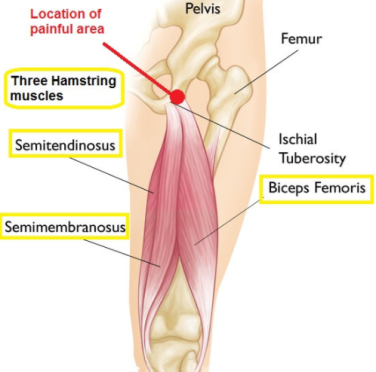
Studies estimate that nearly 80% of yoga practitioners will experience this injury at some point during their practice. It is most common in flexible, female yoga practitioners. Proximal means that the injury is close to the hip joint. Hamstrings refers to the three muscles that make up this group: semimembranosis, semitendinosis, and the biceps femoris. These three all connect with the ischial tuberosities or the “sitting bones” of the pelvis at their origin (for my anatomy nerds, one of the two biceps heads originates on the femur, not the pelvis). The location of the muscle attachment is the reason for the buttock pain during sitting or deep hip flexion.
I use the word tendinopathy here to cover three types of tendon disease: tendinitis (acute injury with inflammation), tendinosis (chronic injury with cellular degeneration but no inflammation), and paratenonitis (inflammation of the outer layer of the tendon). In the field of yoga, we are not here to diagnose or treat injury, and the way we’d approach any of these conditions or a combination of them is the same, so PHT is a good coverall for our purposes.
Depending on the severity of the damage, an injury to our tendons can take from two to 26 weeks to heal. The average yoga practitioner in America heals a PHT in about 18 months. If we want to shorten the healing time, feel better, and get back to our yoga practice we have to unpack some of the reasons that healing isn’t occurring.
Why are so many yogis getting hurt?
It’s helpful to know that this injury happens most commonly in our most flexible and moderately experienced yoga practitioners. It frequently occurs three, five, ten, even 15 years into practice and is generally seen in a practice focusing more on increasing flexibility and range of motion than on strengthening the muscles and tendons at the back of the leg and hip. This is endemic in American Yoga culture.
The challenge for flexible students is that a few months into their yoga practice, the sensations in forward folds decrease significantly as they rapidly approach maximum range of motion for their genetics. The “pursuit of sensation” leads to a tricky situation where students struggle to differentiate between uncomfortable sensations of stretching and uncomfortable sensations of damaging the muscle or its attachment.
In the field of hot yoga, particularly Bikram Yoga’s 26 posture series, the raging debate about “lock the knee” or “micro-bend” have both led to exacerbating the prevalence of PHT because neither side of the debate addressea the supportive role of the deep six hip rotator muscles in preventing hyper-extension and supporting the hamstrings attachments.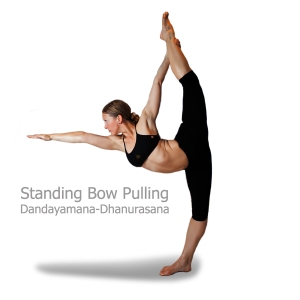
As teachers, we need to deepen our understanding of body weight distribution, hyper-mobility, and the roles our muscles play in taking the pressure off of our soft tissues. Too often, I see Instagram posts of yogis in Standing Bow or Dancer’s Pose with a relaxed posterior hip, internally rotated femur, and a hyper-extended knee. The answer to this problem isn’t a “micro-bend” in the knee. It is a stronger set of hip muscles and a well-aligned femur. More on how to do this under “Pranayama” below.
Note how internally rotated the standing leg is in the above photo and how far behind the ankle her knee is located. (photo credit 105f.com)
Our responsibility as yoga teachers is to help our students both build strength and control, and also tune in to their bodies to listen for clues to injury in its early phases. We are obliged to seek continuing education with experienced teachers who can help us “see” in a body when more or deeper is no longer better.
If you have a history of knee problems, Baker’s cyst, patella-tracking problems, it may all boil down to not stopping the thigh from internal rotation. If you want to heal your knee, you have to strengthen your hips. Or use your ass as a doorstop for your knee.
Did I over-stretch it?
One of the greatest damaging forces to tendons is compression, not stretching. All of our forward-folding postures press the hamstrings tendons against the bones of the pelvis and continually increasing the compression over time gradually increases the extent of the damage.
Many yogis hang in the back of the hip for standing postures with the hip joint behind the ankle. This misalignment puts a tremendous amount of compressive force on the hamstrings tendons against the bone. The issue is often not one of stretching the tendon as much as it is aggressively compressing it.
How do we stop the injury?
The first step in helping my students with PHT is getting them to understand that you can’t stretch out an injury like this. Imagine you are reading the Sunday paper and the top crease has a small tear in it. “Shoot!” you think. “My newspaper is torn. I’m going to grab both sides of the paper and pull them apart so I can get it to stick back together.”
That doesn’t make any sense, does it?
Most of us think, like we do about lower back pain, that the answer to healing an injury is to stretch out the pain. The solution to healing an injury like this is to stop tearing and micro-tearing the area and give it time to heal.
You need to glue the paper and leave it alone so that has time for the glue to dry firmly. That’s our number one problem. We can’t seem to leave the paper alone long enough for the glue to dry. We keep going back to it, “It is ready yet? How about now?” In this way, we keep re-injuring the damaged tissue.
Most of my students say. I don’t want to stop forward bending. It’s going to limit my practice! Here’s the truth bomb. You have a choice to limit your end-range hip flexion for four to six months or be in pain for over a year and have to limit your end-range hip flexion for four to six months then. Which one sounds better?
Understanding the Healing Cycle
The healing response in the human body is a predictable process of three over-lapping phases: inflammation, repair, and remodeling. After an injury, your body immediately rushes blood and white blood cells to the area to stop the injury and begin the healing process. The inflammation phase usually occurs during the first seven days following an injury. This part of the process is generally painful and accompanied by redness and swelling.
Next, the body begins the repair phase or proliferation (of new cells) phase. Here the body lays the scaffolding that will bridge the damaged tissues. The process in this phase of healing is called granulation. The body sends tiny tendrils of scar tissue across the breach to show the body where to lay the permanent tissue.
Granulation occurs around 6 to 14 days and the area immediately feels more stable. Pain and inflammation decreases and you start to feel better. There is a strong urge to return to normal activity around two weeks post-injury. This is where we make our biggest mistake.
We resume normal use of the area and the granulation tissue is not strong enough to bear the load. I picture these granulation tissues like the tiny gossamer filaments of a spiderweb. Under normal use, the tender fibers tear and the body initiates the inflammation phase again.
If you can wait, if you can stop yourself, the next weeks of healing are the remodeling phase. Around three weeks after the injury, the collagen of the scar tissue laid during granulation matures and is constantly remodeled until permanent tissue is achieved. This process takes around 12-16 weeks, but some tissues can take up to 26 weeks to fully mature. Mark your calendar with these dates as points to check in with your own healing process. With this injury, you must limit end-range hip flexion for three to six months.
Enhancing Maturation
While most students can grasp this healing protocol, most of us forget to put in the time to strengthen the support muscles of the back of the hip and the hamstring muscles and tendons. If we are going to prevent this injury from happening in the future, it’s imperative to also strengthen the tendons. A tendon is strengthened by loading the muscle and, thereby, the tendon.
I’m a big fan of Jules Mitchell’s progressive loading technique for healing PHT. Take your time with each of the phases of this loading technique. Give yourself a week or two with each exercise before moving on to the next. Remember the exercises can be done with your feet on an exercise ball, a chair, your coffee table or couch. You can also do all of the exercises in the Bridge Pose position and slowly move your feet farther away from the buttocks as your strength increases.
In addition to these tendon-toning exercises, you must immediately improve the way you use the muscles of your hip and the alignment of your body in one-legged postures.
Most of us under-utilize the deep six rotator muscles that stabilize in the hip and forget to fire the hamstrings to keep the body’s weight forward rather than hanging from the back of the hamstring tendons. I’ll go into the 26 postures from the Bikram series in detail below, but remember that the bones of the leg do their job best when they are lined vertically hip over the knee and ankle joints. The bones of the leg bear weight longitudinally much more effectively than horizontally or at an angle.
When the body’s weight is in the heel in a hip-flexing posture like Warrior 3/Balancing Stick, most of the body’s weight hangs from the tendon of the hamstrings muscles. When the leg is aligned vertically, the majority of the body’s weight is borne on the bones of the leg and the muscles and tendons of the leg simply stabilize your balancing body.
Can I heal my injury and still go to yoga?
Absolutely! Yoga benefits healing by increasing circulation throughout the body and giving you the opportunity to build muscular strength. If you’ve been overworking the hamstrings, I’m confident there are at least another dozen other muscles you can wake up and get them to do their fair share of the work around your body.
Increasing circulation speeds healing. We get the waste products out and the building blocks in. By increasing circulation you help your own body do what it does best: keep you healthy, active, and pain-free.
Your first rule of thumb in healing a sprain, strain, or tendinopathy: Don’t poke the bear. If you can feel it, you went too far.
I grew up in rural Vermont. We give directions like, “Turn left a half mile before the big, red barn.” That really is how you get to the Cabot Creamery, but sometimes you have to go too far a few times to figure out how to get there. The goal of the mindful yogi is to stop before you feel sensation: pain, pulling, stretching to the injured tendon. In the beginning, you’ll go too far a few times, but hopefully you’re a fast learner.
You have to stop the cycle of injury to the area. In biomechanics, this means no end-range hip flexion. Hip flexion refers to flexing or closing the joint of the pelvis/hip and the femur bones. In yoga class, this means no full forward folds for about a half year.
Healing and the 26/2
Please find below specific instructions to modify and/or moderate each of the Classic 26 postures.
Pranayama/Deep Breathing:
In Pranayama, you have an opportunity to practice strengthening the muscles at the back of the hip to prevent injury in the future. Stand with your feet together in front of a mirror. Side-by-side and touching or with a small gap in between for those with hip injury/pain. Look at your legs in the mirror. For most flexible people you’ll notice that the femur bones internally rotate and the kneecaps have a very slight inward cast as if you were going slightly cross-eyed.
Note: The more internally-rotated the thighs, the wider the gap will be between the knees. There are some students with a true “bow-legged” stance who will have a large gap regardless. This student is the exception, not the rule. Many students think they are naturally bow-legged when they just have weak hip muscles.
Internal rotation of the femurs is a prerequisite for a hyper-extended knee. If you can stop the femurs from turning inward, you will prevent the knee joint from moving beyond 180 degrees,effectively stopping hyper-extension.
The muscles that do this work are some of the deep six rotator muscles: the piriformis, the obturators, the gamellus, and quadratus femoris. They are also part of the base of the pelvic floor. These unsung heroes are some of the most important muscles that connect the legs and trunk. Take a look at them here. They’re very cool! Looking and seeing where the muscles insert and originate will help you understand what they do and how to find them.
Looking at yourself in the mirror, very slightly externally rotate your thighs. For some it helps to imagine you were turning the backs of your knees towards each other. What you want to see in the front mirror is a small movement of the kneecaps outward until they point straight ahead. It is a subtle, but visible movement. If you see gross movement, you’re trying to do it with your glutes.
Place your hands on your buttocks muscles. Relax them. Then place your first two fingers in the “gluteal fold” between your buttocks and the back of your thighs. Now contract there by trying to turn the backs of your knees closer together.
Those are the muscles we seek. Feel the way those muscles deeply contract underneath your fingers. Still having trouble? Ask your yoga teacher or a pelvic floor physical therapy specialist to help you find those muscles. Finding and strengthening and increasing the flexibility of those muscles will not only help with your ass pain, it’s also going to help you stop peeing your pants when you jump on the trampoline.
Pranayama deep breathing is your chance to practice contraction of those muscles so you’re ready later when we try to balance on one leg.
Pro tip: During Pranayama, contraction should be softened on the inhale and deepened on the exhale in rhythm with the natural movement of your pelvic floor.
- Exhale breathing: pelvic floor, deep hip muscles, and abdominal wall contract.
- Inhale breathing: pelvic floor relaxes and abdominal wall inflates.
Half-Moon pose:
In Half Moon, we continue to work on engaging the deep rotators. In this pose, you’ll create the contraction and hold it the entire side. Relax. Engage. Start left side. Repeat for the back bend.
Pro tip: Can you feel your hamstrings muscles engage, too? The hamstring and calf muscles are important counteraction of the strong quadriceps muscles at the front of your thigh. The traditional “lock the knee” cue means a Battle Royale between the muscles that extend and flex the knee. If both sides are equally contracted, you have a very stable standing leg.
Hands to Feet:
Pump your brakes, big time. This posture centers around complete end-range hip flexion. We are trying to fold the pelvis down completely to the thighs. Remember your rules? No end-range hip flexion for 3-6 months.
Mind the warm-up in this posture. Simply move the hips side to side. Some teachers have added a cue to their class to “Bend into the right knee. Bend into the left,” or “Walk in place.” Bending the knees applies a tremendous amount of compression to the hamstrings tendons and should be avoided in any case where the yogi has a history or suspicion of PHT. Do you remember the stat from the beginning? That’s 80% of the people in class. In other words, that cue is inappropriate for the general public.
There are two approaches to this posture with a PHT. Some teachers will tell you that you MUST bend the knees. There is no science-based evidence to prove this assertion is true. Depending on the location and severity of the injury, one may work better than the other for you.
- Straight legs: Keeping the legs and spine straight, slowly walk your hands down your thighs or to the floor until your body makes a 90-degree angle. Press your hands against your thighs to create traction along the spine. Stop at any point you begin to feel pulling on your granulating injury.
- Bent knees: Bend your knees and lower your upper body toward your thighs. If you are asymptomatic here, you may reach around and grab your heels. Proceed to depth with caution. Do not straighten the legs completely until the maturation process is complete and your injury does not bother you at any time.
The one absolute no-no is to come down into a forward fold with straight legs and then bend your knees. Imagine the hamstrings muscle like a rubber band that is attached above the hip joint and below the knee joint. When you flex the hip, it pulls the rubber band tightly over the hip and knee joints. If the tendon is already compressed against the ischial tuberosity and you bend your knees (picture yourself plucking the rubber band), you will increase the load and compression to the tendon and aggravate the injury.
Either bend your legs before you flex the hip or keep the knee straight and only flex the hip to tolerance. This same principle will apply in Standing Separate-leg Stretching, Standing Separate-leg Head-to-knee, and Paschimotthanasana.
Awkward pose:
Awkward presents another opportunity for you to practice the action of contracting the deep muscles at the back of the hip. I like to picture those muscles like a great big hand holding me from the outside of the hip on the thi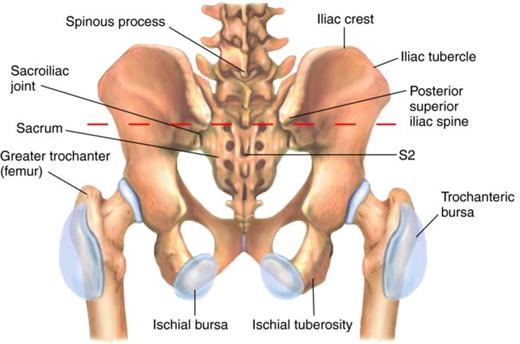 gh bone (the greater trochanter of the femur) to the bottom of the pelvis where you sit (your ischial tuberosities, pictured right). Imagine that hand, those muscles, pulling the femur and pelvis together, and closing or stabilizing the back of the joint.
When you sit down in Part One, instead of flaring your pelvic floor backward, try to pull the back of your hips together. It almost feels like you could pull your pelvic bones together. Again, it’s a small movement. If your knees fly out, you’re using your butt. If your tail tucks under, you’re using your psoas. Try to create a sensation like are lifting above the hip flexion, rather than sinking back into it. The movement of the deep hip rotators are subtle, but strong. Repeat this action in Part Two.
In Part Three, most yogis naturally engage the deep six on the way down. It’s how you keep your spine straight. If you’ve been pitching forward to come up, it’s because you’re under-utilizing these hip muscles on the way out. Before you come up, imagine you could pull your two ischial tuberosities (sitting bones) together as you lift your pelvic floor. You’ll have so much strength and control on the exit that it feels like you’re riding out on a geyser.
Eagle pose:
Don’t be surprised if you can’t hook your toes or sit very low in this one with a PHT. Depending on the location of the injury, the internal rotation required by the femur to hook the toes beneath the standing-leg’s calf muscle can twist and pull on the back of the leg enough that it can irritate the hamstrings attachment. Cross the legs and make sure you’re asymptomatic during the posture. Don’t poke the bear.
If it feels okay, go for it!
Standing Head-to-Knee pose:
Just like your teachers told you back in your first class, your standing leg is the most important part of this posture. For at least a couple of weeks, practice next to a side mirror and watch your body’s alignment. It requires the same engagement we did with double legs in Pranayama and Half Moon of that hand-like set of muscles of the back of your hip. Before you even shift the weight, engage the posterior hip muscles and stabilize your leg.
Look at yourself in the mirror from the side. When you stand on one leg, does your hip joint hang behind your ankle joint? Close the gap between the greater trochanter of the femur and the back of the pelvis/sacrum to keep your weight forward. See below. The picture on the left shows support from the muscles at the back of the leg and hip. The photo right shows a relaxed posterior hip and weight in the heel.
When you round down to grab the foot, and again when you start to kick forward, your weight will attempt to shift back into the heel. Be vigilant with these hip muscles and focus on keeping the weight forward so you don’t strain your healing hamstrings attachment.
When you are holding the leg with the tendinopathy in your hand, it’s OK for you to kick the leg forward as the hip will only be at 90° of flexion. Since this injury happens frequently with flexible students, you may be very easily able to straighten the kicking leg and still be asymptomatic. If it does hurt to straighten the leg, keep it bent for the duration of the healing process.
For flexible students: as you begin to round the spine over the thigh and bring your elbows down, keep the movement in your spine. Don’t proceed to end-range hip flexion by laying your torso on your thigh as this will increase the stretching and compression of the hamstring tendon and aggravate the injury. If you can get your elbows below your calves without feeling pain or pulling, you are more than welcome to drop your head on your knee.
Proceed carefully. It doesn’t matter if you can’t do this posture for a year. It’s better than living in pain and not being able to sleep at night.
Pro tip: When standing on the injured leg, try to feel the hamstrings muscles contract. In this way, you’ll be contributing to strengthening the muscle and its attachment so the injury doesn’t happen again in the future.
Standing Bow pose:
Utilize all of the work with the deep hip rotators that you’ve been working on since beginning breathing. As you begin to come down in Standing Bow, you are increasing hip flexion and compression of the tendon. You may need to execute this pose in a partially upright position. Mind your end-range hip flexion and proceed to tolerance.
Be vigilant in Standing Bow about the quality of your standing leg and prevent the weight from sinking backward and the knee from hyper-extending. As soon as you sink back, you are loading a damaged support structure and will only drag out the healing process.
Can you go down when you’re standing on the side that’s not injured? Sure!
Balancing Stick pose:
Come down only as far as you are asymptomatic. It is likely that your body will only come down to something like a 45° angle from vertical, maybe even less. The work you get to do here is contracting the hamstrings muscles so that even as you begin to introduce stretching back into your hammies, you’re doing it from a place of support and strength rather than hanging into the back of the hip. When you are lifting the injured leg, concentrate on deep contraction of those muscles, building strength as you heal.
Standing Separate-leg Stretching pose:
We approach Separate-leg Stretching just like Hands to Feet.
- Keep a flat back and bend your knees until you can touch the floor. Be mindful of your injury and slowly press your knees back to tolerance.
- Keep your legs straight and walk your hands down your thighs as far as your body goes without pain.
Pro tip: Many students find it helps to have something to put their hands on like the top of their water bottle or even a yoga block. That way they can practice weight forward, contraction of the back, legs and hips, without being tempted to sink down deeper into end-range hip flexion.
Triangle:
The primary concern for the injured hamstring is when it is the bent leg. Students should not be encouraged to sit down if it feels like pulling or stretching to the hamstrings attachment. It’s okay to stay up high and move the arms. For some students it’s impossible to move the arms and torso without feeling the pain. Start from the first cue the teacher gives and proceed only as far as you can asymptomatically.
Standing Separate-Leg Head-to-Knee:
This posture should be approached like Standing Separate-leg Stretching and Hands-to-Feet. Depending on the spot of the injury and the sensation the yogi feels, choose optoin one or two.
- Keep both legs straight and round the spine down like a candy cane as far as you can go without injury or pain and hold it there.
- Bend your front knee and place your hands on the floor. From there, keep the leg bent and curl the spine up towards the ceiling.
In my own recovery, I found both sets gave me different sensations in my spine and hips so I would practice one in the first set and the other version in the second set.
Tree pose:
In most cases, people are asymptomatic in Tree pose. If it pulls to lower and rotate the thigh, don’t do it.
Toe Stand:
In some cases, clients are asymptomatic in Toe Stand. Great!
If the forward fold creates a pulling sensation at the point of injury, simply repeat Tree pose.
Wind-removing pose:
Wind-removing pose is comfortable for most students because the knee is bent and torque on the muscle and tendon is reduced.
In a few extreme cases the student may feel pain simply flexing the single leg up. There’s nothing you can do about this but wait. In that case is I’ve had students simply bend the hip to a 90° angle and hold there.
Cobra series:
All the Cobra series postures require contraction of the hamstrings and hip muscles. These contractions stimulate circulation to the muscle area and build strength in tissue structures. Give it all you’ve got!
Fixed firm:
Fixed Firm is generally unaffected by PHT.
Half Tortoise:
Most students are comfortable in this pose.
Rarely, you may have a student with a very serious injury who needed to do a version like what you’ve seen in some Vinyasa classes called Puppy Dog pose. In this position, the shins are on the floor hips directly above the knees at a 90° angle and then you walk the hands out in front and drop the chest towards the floor. This allows the student to maintain some of the spinal traction and shoulder-stretching benefits of the posture, without aggravating their injury.
Camel:
Camel is another opportunity to strengthen the hamstrings, hips, and buttocks muscles with the same principles as the Cobra series.
Rabbit:
Most students are asymptomatic in this posture. Proceed in depth to tolerance.
Head-to-Knee pose:
This is a sticky posture for most students with PHT. Some feel pain when the injury is on the straight leg, for others when it’s bent. In the beginning, most students should simply sit upright and set the legs. Then, lift the arms overhead creating spinal traction and begin to rotate towards the side. Most students will not be able to grab the foot early on. Arms can reach up over head for spinal traction or be placed on the floor on either side of the straight thigh.
Many students will feel pain if they bend the knee and grab the foot or if they round down. It’s more important that the student is asymptomatic in this posture than that they get the spinal flexion. Help the student to explore different parts of the ranges of motion in this pose to see what they can do without feeling the pain or aggravating the hamstring attachment. This pose needs to be modified on a case-by-case basis.
Stretching pose:
One of the most challenging aspects of this posture is the set-up cue to “walk the hips back right and left.” For some students this pinches the hamstrings tendon between the pelvis and the floor and can be extremely painful. This cue should be skipped in students who are symptomatic.
Choose the start bent or start straight approach for Paschimotthanasana. The major principle here is no end range hip flexion and no pulling or pain at the point of PHT.
- Bend the knees and hold the feet with the spine straight
- Keep the legs straight, flex the feet, and sit up straight.
Spine Twist:
Most students are asymptomatic here, but you may get a few who have pain when folding in the bottom leg. Treat these students like you would a knee injury. Keep the bottom leg straight, foot flexed, and across the top leg over the knee.
Khapalbhati:
The client should be asymptomatic.
As you can see, at least half of the postures in the series are unaffected by the hamstring injury and all of them can be modified to accommodate the student’s needs for however long it takes them to heal this injury.
It may also be worth it to look into how your diet can support your healing. One of the strongest indicators of healing is albumin levels in the blood. This is a protein that is critical in healing process. Low-protein diet should not be attempted while healing an injury. There is also some evidence out there that certain nutritional supplements can support muscle and ligament healing. Consult with your doctor, functional nutritionist or naturopath to get suggestions for those products.
In addition, if you are experiencing tendinitis or inflammation and pain, it may be helpful to add foods to your diet that help to decrease inflammation. The powerhouse most folks know about is turmeric with black pepper. It’s in lots of really delicious foods, so why not add it to your fried rice or your coconut curry soup? Google is a great place to find more foods to add to this list like green tea, salmon, and blueberries. Healing an injury is it just the process of getting your postures right, but getting your mind right, reducing stress in your life, and getting plenty of rest. Pain from an injury like this is a cry for help. What other places in your life do you need support?
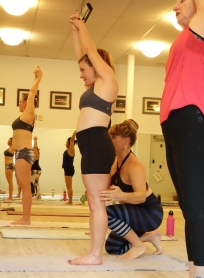
Sara Curry is a therapeutic Hatha Yoga teacher from Portsmouth, New Hampshire with over 15 years experience in the field. Right, she assists a student in activating her posterior hip muscles to prevent hyper extension. Look at that nice, straight leg!





 gh bone (the greater trochanter of the femur) to the bottom of the pelvis where you sit (your ischial tuberosities, pictured right). Imagine that hand, those muscles, pulling the femur and pelvis together, and closing or stabilizing the back of the joint.

